Guest Designer - Katarina Prevendarova
Hi Everyone,
This is Katarina Prevendarova and today I am very excited to be guest designing for Pinkfresh Studio!
I’m from Slovakia, Central Europe, where I live with my husband and five year old son. I’ve been scrapbooking for 4 years. I love creating 12”x12” layouts as well as working in traveler’s notebooks, documenting all our adventures. I enjoy creating mixed media backgrounds and love using my stamps. Creating projects that inspire other crafters around the world is what makes me happy!
My instagram https://www.instagram.com/katka_loves_paper/
My YT channel https://www.youtube.com/c/KatarinaPrevendarova
I am using the new colorful Holiday Magic collection – and it really was a magic to create with it. As soon as I saw the products, ideas started coming and I couldn’t stop playing. I created two layouts and a couple of gift tags. Let’s have a look!

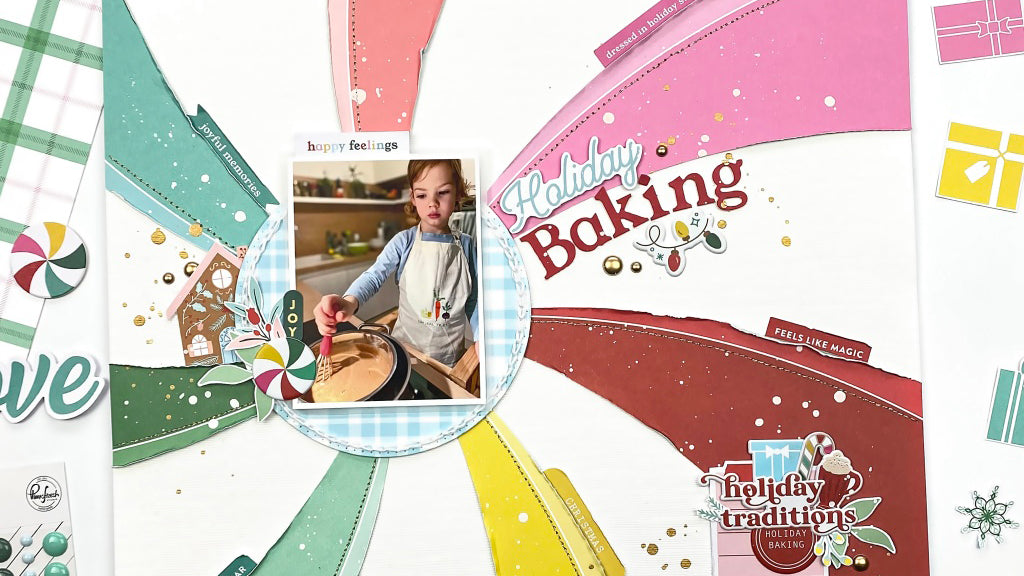
For my first layout I was inspired by the Candy Cane paper. I cut the colorful pieces, distressed their edges and adhered them onto a sheet of white cardstock.

Next, I machine stitched each of he pieces with gold thread. The middle of the candy cane created a perfect spot for the photo of my son helping with our holiday baking. I backed it with a piece of vellum and a cut out circle from the Deck the Halls paper, that I hand stitched around with chain stitch.

I loved all the movement created by the colorful swirl, so I even emphasized it with my title, for which I combined one of the ephemera pieces with the red chipboard alphabet. On my layout I created three clusters, mixing the cardstock stickers, ephemera, puffy stickers and pieces fussy cut from patterned papers.

I added a fun detail by tucking phrase stickers and die cuts in matching colors behind the colorful pieces of paper. Finally, I added golden enamel dots and gold and white splatters. Love how it turned out!

Supplies: HOLIDAY MAGIC: 12 X 12 PAPER PACK, CARDSTOCK STICKERS, CHIPBOARD ALPHA, METALLIC ENAMEL DOTS, EPHEMERA PACK, PUFFY STICKERS
For my second project I wanted to create a design full of snowflakes and winter fun.

For my background I used the Holiday Vibes paper with a beautiful subtle pattern. I tore three crooked strips of the Merry and Bright paper and layered them at the bottom of my layout to create a snowy landscape. This created a perfect place to tuck in embellishments. I used the Good Cheer and Candy Cane paper to create two dimensional trees.

Next, I built a little village of ephemera houses, by tucking them behind my snowy hills. To add some more yellow, I used the beautiful Warm Wishes paper to mat photo of my son laying in the snow, having a great time.

I used one of the Title Ephemera pieces as my title and one of the die cut tags for my hidden journaling. I added a couple of die cuts, cardstock stickers and enamel dots around my photo. That cute little bird is fussy cut from the Merry and Bright paper and since I love fussy cutting I also cut out a lot of snowflakes from both sides of the Wonder and Peace paper and scattered them around the top part of my page, combined with little silver enamel dots and a lot of white splatters for some snowy effect.

Supplies: HOLIDAY MAGIC: 12 X 12 PAPER PACK, CARDSTOCK STICKERS, DIE CUT TAGS, ENAMEL DOTS, EPHEMERA PACK, METALLIC ENAMEL DOTS, TITLE EPHEMERA
When I was in the holiday creative mood, I couldn’t stop myself from creating a couple of gift tags. This collection was just asking for it.

I used the Essentials Braided Tag die set to cut some tags from the patterned papers.

I then decorated them using the mix of die cuts, puffy stickers and other embellishments from the collection. I can’t wait to add them to my Christmas gifts this year!

Supplies: HOLIDAY MAGIC: 12 X 12 PAPER PACK, CARDSTOCK STICKERS, CHIPBOARD FRAMES, DIE CUT TAGS, EPHEMERA PACK, METALLIC ENAMEL DOTS, PUFFY STICKERS, TITLE EPHEMERA, ESSENTIALS: BRAIDED TAG DIE SET
I loved playing with this beautiful collection and creating these fun projects. I hope they inspired you in some way today. Thank you so much for stopping by, friends!
Katarina


1 comment
This is gorgeous! Is there a tutorial somewhere on how to make the origami trees?