Fall Leaf Dies for Christmas!
23 Aug 2024
1 comment
Hi friends! Emily Midgett here with you today, and I have some festive holiday inspiration using the brand new Poinsettia Frame Press Plate and coordinating stencils, as well as the gorgeous new Holiday Greetings Sentiments Press Plate set. To make my card extra festive and luxurious, I did pull out some older dies, including the Fall Leaf die, which gives a holiday feel when die cut from some olive green cardstock. Let's get started with the details!

To start my card, I did some hot foiling using the
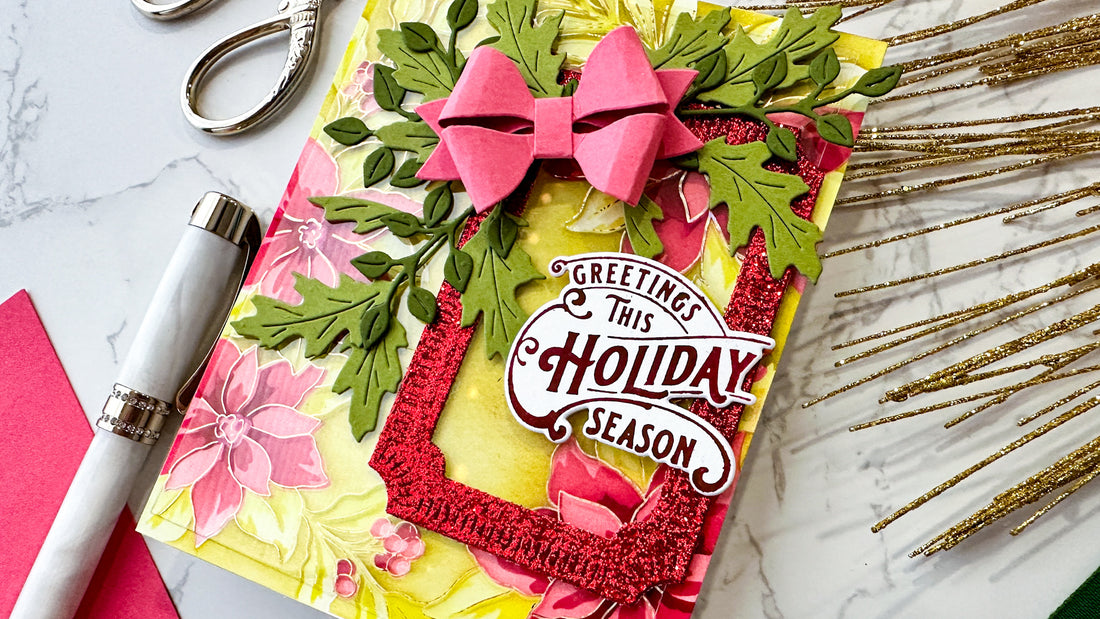
Poinsettia Frame Press Plate onto some clear acetate. I love using hot foil with clear, heat resistant acetate; I think that the technique elevates the card and makes it look so polished and professional! The beautiful details of the press plate come through splendidly on the super smooth surface of the acetate. To add some color behind the foiled acetate, I placed an A2 panel of white cardstock on my sticky mat, then used the handy tick marks on the corners of the coordinating stencils to align the stenciled areas perfectly without even using the stamp set or the press plate as a guide! I used Limoncello, Citron, and Bay Leaf for the green foliage and solid areas behind the images, and Passion Fruit, Berrylicious, and Candy Apple inks for the layered poinsettia stencils.

Once I had completed the stenciling, I needed to create some solid die cuts in order to be able to cleanly adhere my hot foiled acetate panel to my stenciled panel. I like to use a frame to draw the eye to the sentiment or focal point, so I die cut some of the Essentials: Notched Corner Frame dies from some Ruby Glitter Cardstock. I also die cut some foliage from two different shades of coordinating warm green cardstock using the
Fall Leaf die and the Garden Wreath die set. Cutting these two non-holiday die designs from green cardstock and pairing them with a coordinating coral-red bow from the Artistic Bows die set helps to create a lush holiday swag to adorn the corner of my sparkling frame!

For the greeting, I used the new
Holiday Greetings Sentiments Press Plate set with
Candy Apple ink. I die cut the unique sentiment with its coordinating die, then began arranging the solid die cuts on my acetate foiled panel. I adhered the die cuts to the panel with liquid adhesive as well as different heights of foam adhesive to create lots of dimension and interest, then flipped the acetate panel over and added some thin adhesive squares behind the solid die cuts to hide the adhesive and keep my acetate nice and clean! I contemplated adding some sparkly gems, but I think this card has enough going on, don't you?
Well, that's all for my project today! I love finding new ways to use our older products, especially when the product can do double duty for both regular and holiday cards. Thanks so much for stopping by today, and have a marvelous day!
1 comment
I love the stencil and all of the color combination l wouldn’t think to put together but it’s so festive and beautiful.