Dainty Floral Frame - three ways | Raquel Arribas
Happy Wednesday friends!
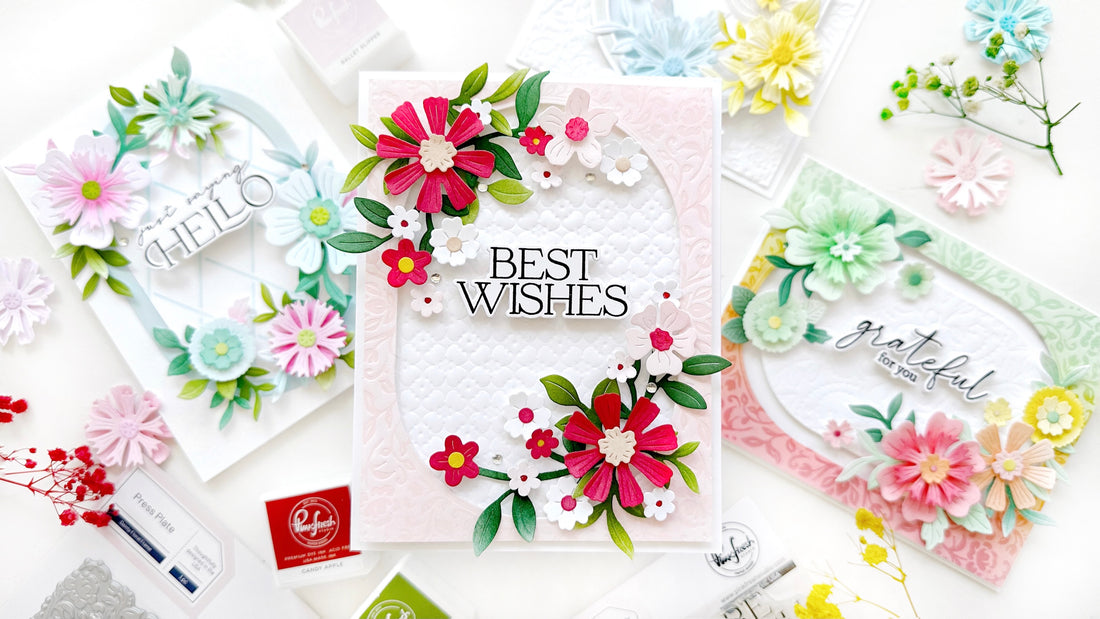
I'm back on the blog sharing several ideas to use the new Dainty Floral Frame Press Plate. As I did on one of my previous post, I used different techniques to get the most out of this gorgeous press plate.

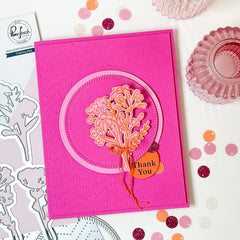
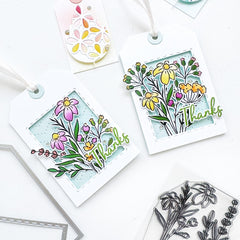
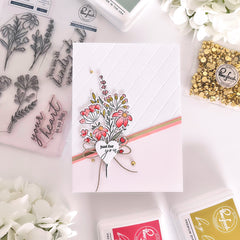
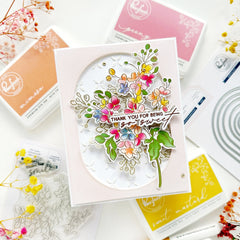
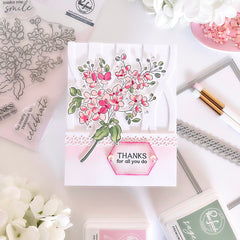
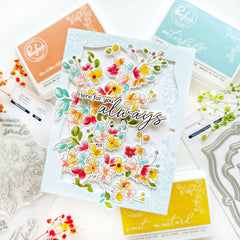
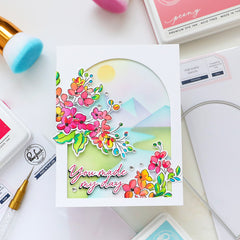
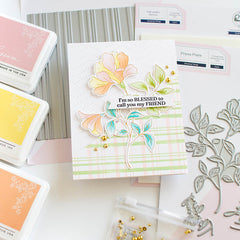
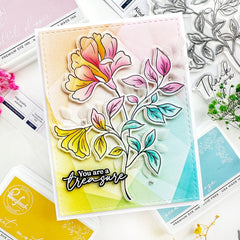
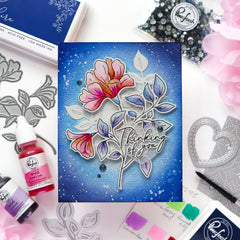
For my first project I dry embossed an A2 panel with this press plate. I trimmed the borders about 2/8 inches on each side and cut out the oval center too with the largest of the new Nested Oval dies. I wanted this card to be very clean and bright with a pop of color, so I ink blended the borders of another panel with Ballet Slippers, Mustard Seed and Sky blue . Next up I hot foiled the largest of the Nested elongated ovals Press plates with Matte Silver Glimmer hot foil and foam mounted in onto the oval center. I embellished this oval with some flowers and leaves from the new Garden Party die and stencil set
The sentiment is from the Here for you sentiment stamp.

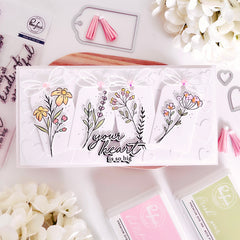
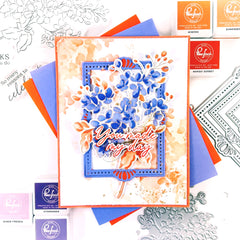
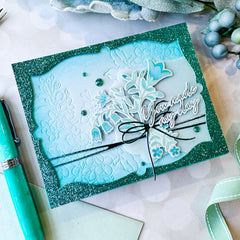
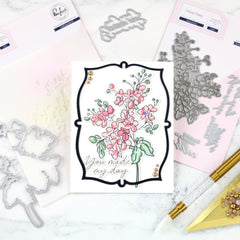
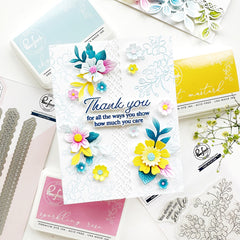
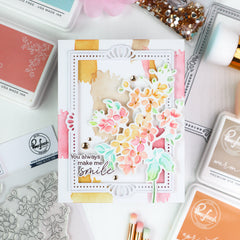
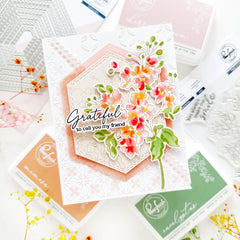
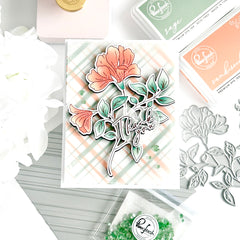
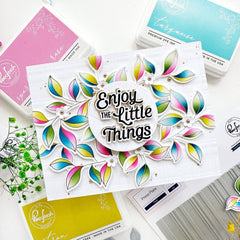
For my second project I decided to use Opal Glimmer foil with the Floral Frame Press Plate. The detail of this plate is just so pretty in real life... It adds such a beautiful and subtle dainty look. To add a little extra texture, I created a background with the Slim Argyle Layering stencil set in Ocean Breeze ink and cut out a light blue Oval shape with the Nested Elongated Oval dies.

I went a little bit overboard decorating this front panel with my Garden Party die set. I used Ocean Breeze, Spruce Tips, Grassy Knoll, Olive, Sparkling Rose and Raspberry Bliss. The sentiment is also from the Here for you stamp set.

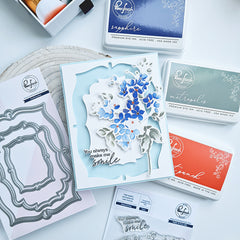
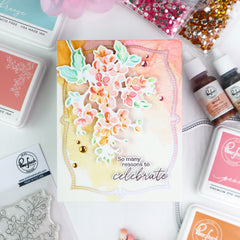
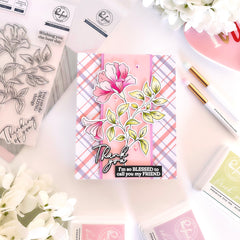
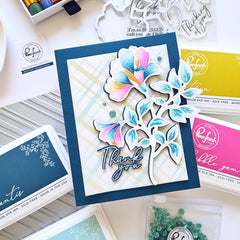
For my third and fourth projects I wanted to try a technique that the amazing Carissa Wiley shared a while back: using regular cardstock with press plates.
I started this project ink blending an A2 panel with Ballet Slipper with the new 1" blending brushes. I taped a Spellbinders Cotton cardstock to this panel and adhered it to the Platen. Next up I applied Ballet slipper onto the Dainty Floral Frame Press Plate too, placed the platen on top and run it through my die cutting machine. Look at this tone on tone texture pattern you can get, it's just so lovely.

Once I cut out an oval with the Nested Elongated Oval dies, I foam mounted my light pink texture panel onto another panel I had previously dry embossed with the Dotted Petals Press Plate. I decorated this oval frame using flowers and leaves from the Stylized Floral die set, Sweet Blossom die and Garden party die sets. I used the coordinating stencils to color these flowers with Ballet Sleeper, Candy Apple, Olive, Evergreen and Grassy Knoll. The sentiment I used is from the Here for you Stamp set.

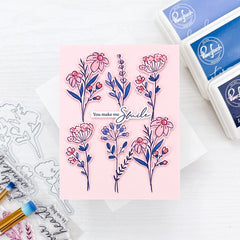
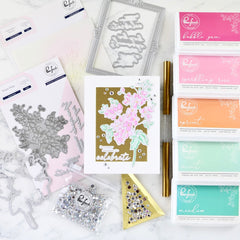
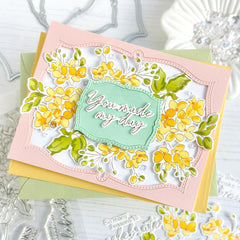
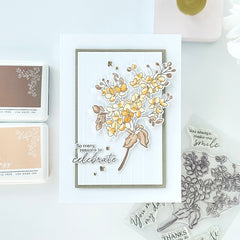
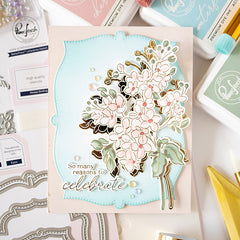
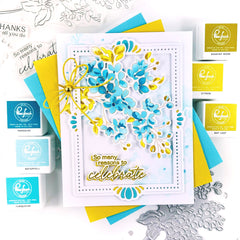
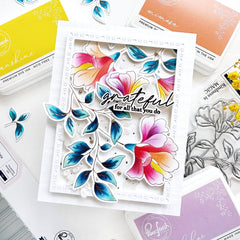
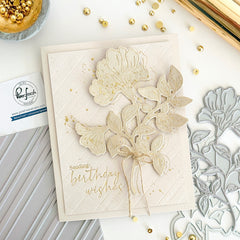
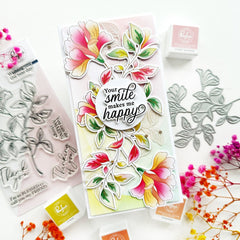
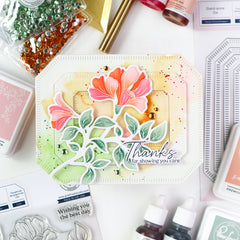
For my last project I used the same technique. This time I inked the background first with Mint, Sweet Mustard, Mimosa and Coral Reef. I added a little bit of Peony in the end to lighten up the coral blend. I applied these same colors onto the Dainty Floral Frame Press Plate, adhered my inked background to a Spellbinders porcelain cardstock and taped it to my platen.

Once I run it through my die cutting machine, I also die cut an oval shape in the center of this panel with the Nested Elongated Oval dies and decorated it with another textured oval die cut I dry embossed with the Charming Stitched Florals Coverplate die. I foam mounted all these elements onto my card base and adhered lots of flowers I had created using both the stencil and die set from the Garden Party set. The sentiment is from the Beautiful Branch Stamp set.
These techniques are so easy and so fun, so I encourage you to try them out.
I hope these ideas inspire you and have fun creating!
Thank you so much for stopping by,
Raquel
-
![All Kinds of Wonderful die]()


All Kinds of Wonderful die
3 pc die set to coordinate with the All Kinds of Wonderful stamp set and All Kinds of Wonderful layering stencil set. The main 1-piece die cuts out all four individual blooms, leaving a thin border. There are also two dies to cut out...- $18.00
- $18.00
- Unit price
- per
-
![All Kinds of Wonderful stamp]()


All Kinds of Wonderful stamp
4 x 6 photopolymer clear stamp set designed by Inna Moreva. Made to coordinate with the All Kinds of Wonderful die set and All Kinds of Wonderful layering stencil set. Available for purchase separately. These sweet delicate blooms are perfect for all your papercrafting...- $16.00
- $16.00
- Unit price
- per
-
![All Kinds of Wonderful stencil]()


All Kinds of Wonderful stencil
4 piece layering stencil set made to coordinate with the All Kinds of Wonderful stamp set and All Kinds of Wonderful die set. There is a separate stencil for each layer, with guidelines on each stencil for perfect alignment when using alone. There are...- $15.00
- $15.00
- Unit price
- per
-
![Always Smiling die]()


Always Smiling die
4-piece die set that coordinates with the Always Smiling stamp set, Always Smiling press plate and Always Smiling stencil set. There is a die that cuts around the entire branch image, leaving a thin white border. There are also dies to cut around the...- $19.00
- $19.00
- Unit price
- per
-
![Always Smiling press plate]()


Always Smiling press plate
4-piece press plate set designed by Inna Moreva that coordinates with the Always Smiling stencil set and the Always Smiling die set. There is also a matching Always Smiling stamp set available for purchase separately. Experience the elegance and sophistication of letterpress stationery with...- $19.00
- $19.00
- Unit price
- per
-
![Always Smiling stamp]()


Always Smiling stamp
4 x 6 photopolymer clear stamp set designed by Inna Moreva that coordinates with the Always Smiling die set & Always Smiling layering stencil set. There is also a matching Always Smiling press plate available for purchase separately. This beautiful floral branch will add...- $16.00
- $16.00
- Unit price
- per
-
![Always Smiling stencil]()


Always Smiling stencil
3-piece layering stencil set made to coordinate with the Always Smiling stamp set, Always Smiling press plate and Always Smiling dies. There is a separate stencil for each layer, with guidelines on each stencil for perfect alignment when used alone. Use our smaller blending...- $17.00
- $17.00
- Unit price
- per
-
![Amazing Things die]()


Amazing Things die
3 pc die set to coordinate with the Amazing Things stamp set, Amazing Things press plate and Amazing Things stencil set. There is a die that cuts around the floral stem, leaving a thin white border. There are also dies to cut around the...- $18.00
- $18.00
- Unit price
- per
-
![1/4" Blending Brush set]()
1/4" Blending Brush set
Introducing our sleek and modern ¼” Blending Brush set, part of our newest collection, Studio Essentials. This collection will slowly build as we add high-quality tools with a focus on sustainability. Each set includes (6) ¼” blending brushes with a white lacquer handle, the...- $12.50
- $12.50
- Unit price
- per


1 comment