Color study: matching your cardstock with your main images | Raquel Arribas
Hello again Pinkfresh friends!
I'm always drawn to cards with white backgrounds or cards where white is the predominant neutral color that makes the rest of the elements pop. Well, today I wanted to challenge myself and make some cards with no white space at all.
My initial idea was to create monochromatic cards with lots of texture but i couldn't kept them monochromatic and in the end I integrated analogous colors that went nicely with the whole design.

For my first project I used the Rounded and Braided Rectangle die to cut out a light apricot cardstock. Then I dry embossed the Twist Pattern Die onto this piece of cardstock and cut out a circle with the Nested Circles dies to house all the flowers I wanted to decorate this card with.

Next up I created some flowers with the Sweet Blossoms Stencils and die set. I specifically chose colors that matched my background so I applied Sunkissed for the flowers going softer in some areas and adding extra ink on certain parts to create some interest. I used Grassy Knoll and Olive for the leaves and greenery adding some pressure in certain parts to achive some highlights.
To finish off this card, I used the press plate sentiment from the set Delighted for you Press Plate , added Apricot ink from the Desert Sunset Betterpress Ink Mini set and run my Betterpress platform through my die cutting machine using the same light peach cardstock I used for my background. I achived a better impression I added an extra A2 cotton cardstock to my Platen and believe me it works beautifully. Last but not least I glued some Glitter drops in gold.

For my second card I chose a light blue cardstock for my background. As in my previous design, I added some texture to my background by using the Betterpress Fairytale Frame Press Plate with my light blue cardstock. To achieve a better impression I followed the same steps I did on my previous project: adding an extra A2 Cotton cardstock to the Platen.

To create some interest I foam mounted a light blue diamond shaped diecut I had cut out using the Nested Diamonds die.
For my flowers this time I used the Stylized Florals Stencils and die set with Ocean Breeze, Waterfall, Turquoise, Pacific, Atlantis, Grassy Knoll and Key Lime.
I arranged all these flowers onto my diamond frame and used the Favorite Things Sentiments Press Plates for my sentiment using the same method I described before. The glitter drops Aqua were the perfect bling to finish off this card.

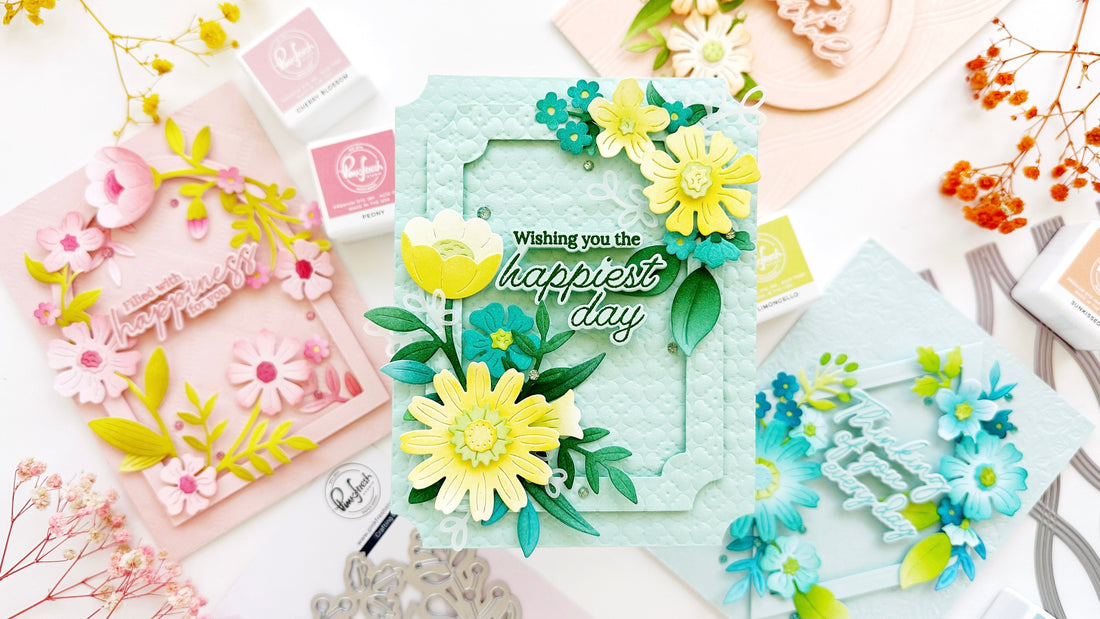
For my third project I used a mint cardstock and the Dotted Petals Press Plate to create my background. This time I used two A2 cardstock pieces and run them through my die cutting machine using the largest die of the Notched Corners Frame dies and then dry embossed one of them with the Dotted Petals Press Plate. I also cut out a frame with the Notched Cornes Frames dies and dry embossed it with the Dotted Petals Press Plate so it coordinated with the background.

To decorate this card I used both the Stylized Florals set and the Sweet Blossoms set using Limoncello, Citron, Fresh Pear, Eucaliptus, Spruce Tips and Mermaid Cove. I really love how this combo turned out. As I said, my first intention was to color these flowers and leaves using Mint to match the background but in the end I couldn't resist adding this vibrant colors to brigten up the whole design.
The sentiment is embossed on the same mint cardstock with Primary Evergreen Embossing powder from Wow. As a final touch I added some Leaf Glitter Drops

For my final project I picked up a light peachy pink cardstock I dry embossed with the Stippled Plaid Press Plate. Next up I used the Nested Arches dies to create an arch in my front panel using the same color of cardstock I used for my background.

Once again I used the Sweet Blossoms Stencils and dies to create some flowers to decorate this card. I wanted to match my flowers with the background so I obviously used Cherry Blossom, Peony, Begonia, Limoncello, Citron, and Spanish Moss. I arranged them around the arch and place the sentiment in the middle. This sentiment is from the Beautiful Branch stamp set and I embossed it with Ranger Rose Quartz embossing powder from Ranger.
Lastly I added some Blossom glitter drops.
I hope these ideas inspire you to create and thank you so much for stopping by.
Raquel
3 Comments
These are absolutely stunning ! 😍