Creating backgrounds with the Plaid and Diagonal Press Plates | Raquel Arribas
Hello Pinkfresh friends!
Raquel here today sharing some ideas to create colorful backgrounds using both the Plaid Press Plate and the Diagonal Press Plate.
From the moment I saw these awesome Press Plates, I knew I wanted to create a colorful background using Pinkfresh Studio mini ink cubes. When you have created your first background, you can't stop trying different color combos...

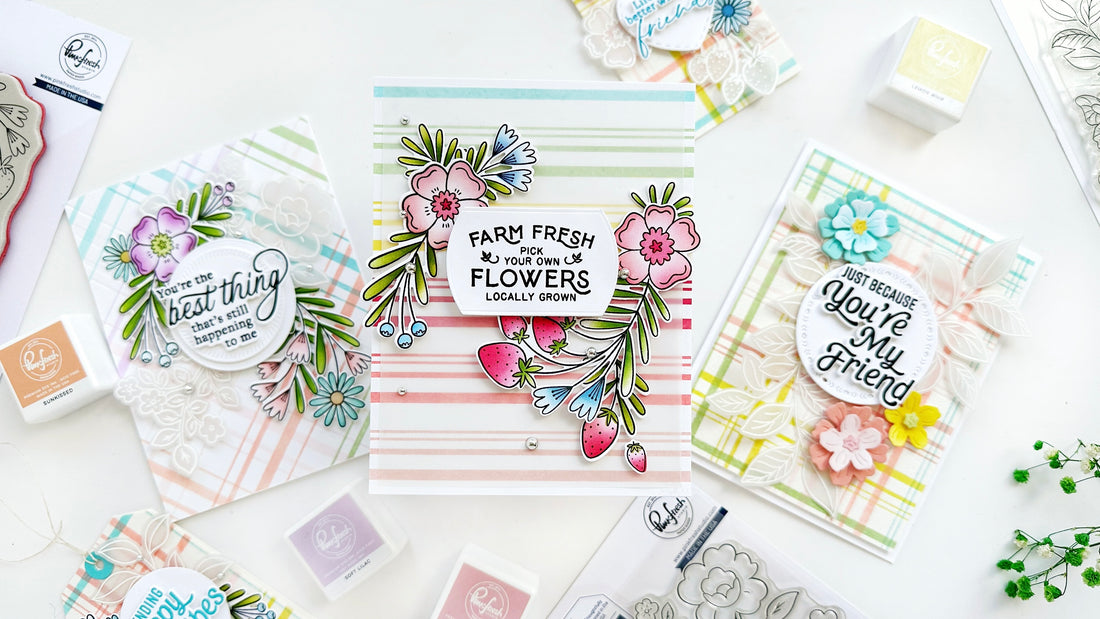
For my first project I used the Plaid Press Plate. I placed my plate onto the chase and inked up from top to bottom: Ocean Breeze, Fresh Pear, Limoncello, Candy Apple, Coral Reef, and Ballet Slipper. Once my press plate was inked, I run it through my Spellbinders Platinum 6 die cutting machine. I could have repeated the process to get a complete plaid pattern but I was afraid it was too busy and didn't want to risk losing this background. I went ahead and cut out a piece of 4 by 5 1/4 inch vellum to soften the vibrancy of the colors.

The design I had in mind was so simple: add a label or a circle with ta black sentiment on top and tuck some flowers as accents underneath.
I used the Basic Label Frames die set to cut out one of the labels and then stamped a sentiment from the Farm Fresh Stamp set with Detail Black ink.
Next up I colored the Berries and Blossoms cling stamp with a color combo I used on another project and that I thought it would go well with the background: Sky Blue, Summer Shower, Citron, Grassy Knoll, Olive, Ballet Slipper, Raspberry Bliss, Passion Fruit and Candy Apple. Once I cut out the images with the coordinating die, I adhered them under the sentiment and added some Silver Metallic Pearls.

For my next project I used the Diagonal Plaid Press plate. I followed the same steps as in my previous card: I inked up my Diagonal plaid plate with ink cubes: Ocean Breeze, Soft Lilac, Ballet Slipper, Coral Reef and Fresh Pear. Once I run it through my die cutting machine, I turned the plate 90 degrees on the chase and inked up my Diagonal Plate again with the same colors except Ballet Sleeper in the center. To add my sentiment I used to circle dies: The larger die from the Nested Circles die and the smaller one from the Mini Slimline Essentials Bundle die set. I stacked them and stamped the sentiment from the Best Things stamp set. Once I cut it out with the coordinating die, I foam mounted it onto the circles.

To embellish my background, I white heat embossed the Never Give up flower onto vellum, die cut it out and placed it under my sentiment. I used once again the Berries and Blossom set and colored it using: Soft Lilac, Candy Violet, Waterfall, Citron, Grassy Knoll, Olive, Lemon whip and Sunkissed. I cut them out with coordinating die and arranged them around my sentiment.
For my last project I used the Plaid Press Plate again:

I used similar colors to ink up this plate: Waterfall, Coral Reef, Ballet Slipper, Citron and Fresh Pear.
To decorate this background I white heat embossed the leaves clusters from the Fluttering Butterflies stamp set onto vellum and cut out some flowers from the Stylized Floral die set. I colored these flowers with the same colors of my background.
Since I had another plaid background, I used the Shaker Tag Book die to create two tags and used some leftovers from the projects I had just created:

I had a blast creating these projects and I hope they inspire you to create!
Thank you so much for stopping by and happy crafting,
Raquel